uxf-tutorial
Part 10 - More settings
Timeout time
We will now add more settings to our task and remove some of the hard-coded values. Let’s start with the timeout timer we have in our TooSlowCheck script. Very simply we can add a new setting to our json of value 1 second:
"timeout_period": 1.0
Then use it in our TooSlowCheck script:
using System.Collections;
using System.Collections.Generic;
using UnityEngine;
using UXF;

public class TooSlowCheck : MonoBehaviour
{
    public AudioClip failSound;
    public Session session;

    public void BeginCountdown()
    {
        StartCoroutine(Countdown());
    }

    public void StopCountdown()
    {
        StopAllCoroutines();
    }

    IEnumerator Countdown()
    {
        float timeoutPeriod = session.CurrentTrial.settings.GetFloat("timeout_period");
        yield return new WaitForSeconds(timeoutPeriod);

        // if we got to this stage, that means we moved too slow
        session.CurrentTrial.result["outcome"] = "tooslow";
        session.EndCurrentTrial();

        // we will play a clip at position above origin, 100% volume
        AudioSource.PlayClipAtPoint(failSound, new Vector3(0, 1.3f, 0), 1.0f);
    }
}
I also did the same with the StartPoint time period - the process is exactly the same as the above. I added a setting called startpoint_period. Here are the changes to the Countdown method in StartPointController.
        float timePeriod = session.settings.GetFloat("startpoint_period");
        yield return new WaitForSeconds(timePeriod);
You can always browse the code at different parts of this tutorial by looking at Appendix 1 to see full changes.
Number of trials
Perhaps one of the most common things we would want to change is the number of trials. We can do this easily with the settings system. In this task, we will set up first a number of practice trials with fully veridical feedback, then the perturbation trials, then finally trials where we remove the VMR to assess de-adaptation to the intervention. Let’s begin by creating three new settings in our settings file:
    "practice_ntrials": 5,
    "perturbation_ntrials": 100,
    "deadapt_ntrials": 20,
Then we can change our ExperimentGenerator script we made earlier to create three blocks with the settings we need.
It’s important to understand how the settings work here. Even though we have the vmr_angle value set at 20 in the settings file, we can override it at a block level. See the diagram here.
using System.Collections;
using System.Collections.Generic;
using UnityEngine;
using UXF;

public class ExperimentGenerator : MonoBehaviour
{
    public void Generate(Session session)
    {
        // generate our three blocks

        int nPractice = session.settings.GetInt("practice_ntrials");
        Block practice = session.CreateBlock(nPractice);
        practice.settings.SetValue("vmr_angle", 0);
        practice.settings.SetValue("clamped_error", false);
        practice.settings.SetValue("timeout_period", 2.0); // more time in practice

        int nPert = session.settings.GetInt("perturbation_ntrials");
        Block pert = session.CreateBlock(nPert);

        int nDeadapt = session.settings.GetInt("deadapt_ntrials");
        Block deadapt = session.CreateBlock(nDeadapt);
        deadapt.settings.SetValue("vmr_angle", 0);
        deadapt.settings.SetValue("clamped_error", false);
    }
}
Logging the values
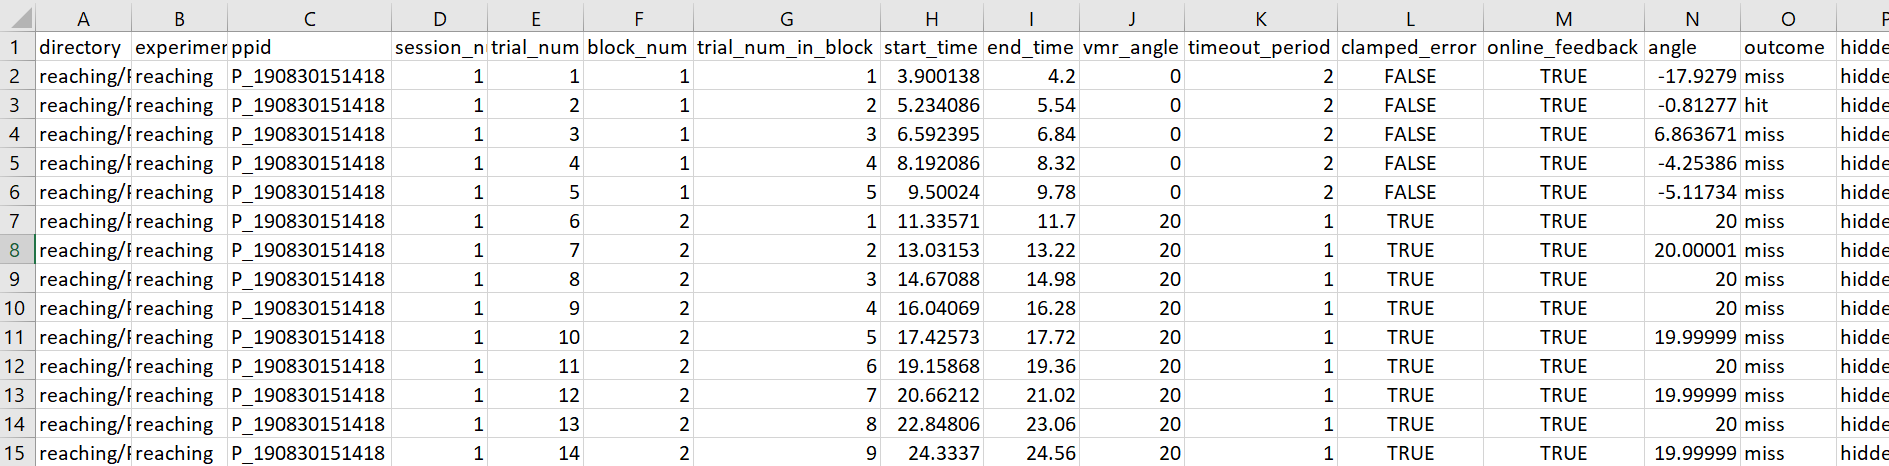
We can get UXF to log the value of our settings on each trial for our output. To do this, add the name of the settings in the Settings To Log field in the UXF Session Inspector:

Notice the trial_results.csv file after running a session:
And also note that UXF outputs a settings.json file into the session folder so you are certain what settings were applied when you ran that session.
More settings
There are lots of other things you could modify using the settings system. You could change the target size, position, distance, etc. The final thing we will add to our settings file here is some instructions text. The instructions will display on screen / in the headset for the player on each trial. We will implement the text display in the next trial. Here is the settings file as of now:
{
    "practice_ntrials": 5,
    "perturbation_ntrials": 100,
    "deadapt_ntrials": 20,
    "vmr_angle": 20,
    "clamped_error": true,
    "online_feedback": true,
    "timeout_period": 1.0,
    "startpoint_period": 0.5,
    "instruction": "Reach for the target!"
}
We can also duplicate this file to have multiple settings profiles. These are useful for storing different conditions, or just for testing. I duplicated the file in StreamingAssets, called it reaching_short.json and reduced the number of trials.
{
    "practice_ntrials": 2,
    "perturbation_ntrials": 10,
    "deadapt_ntrials": 2,
    "vmr_angle": 20,
    "clamped_error": true,
    "online_feedback": true,
    "timeout_period": 1.0,
    "startpoint_period": 0.5,
    "instruction": "Reach for the target!"
}